

How To Reset Hp Compaq Desktop To Factory Settings
Z7_3054ICK0KGTE30AQO5O3KA30N0
hp-concentra-wrapper-portlet
![]() Actions
Actions
HP and Compaq Desktop PCs - Performing an HP System Recovery in Windows Vista
This certificate merely pertains to HP DESKTOP computers that came with Windows Vista. It is Non for HP notebook computers.
This certificate explains how to reset the computer to its original factory shipped country. This document is divided into sections based on the different ways of performing a Arrangement Recovery. Use i of the sections that best fits your needs. Please read ALL Caution statements before attempting a System Recovery!
annotation:It is important that y'all back up of import files before recovering your computer. This HP recovery process also contains a backup feature you can use to backup your important data.
Starting the recovery from recovery discs: use this department when the hard disk drive has been replaced or damaged and yous take a gear up of recovery discs. Recovery discs tin be those ordered from HP or those created by the Recovery Disc Creator software.
Performing a System Recovery completely erases and reformats the hard disk - this includes deleting all data files you have created and stored on the difficult drive. Organisation Recovery reinstalls the operating system, programs, and drivers. Software that was not installed on the calculator at the factory must be reinstalled. Be prepared to reinstall software that was non originally included with the estimator. When recovery has finished, you will need to configure an Net connectedness, set upward antivirus software, obtain all critical Windows updates, virus definition updates, and anti-spyware updates.
circumspection:If the estimator was upgraded to Windows Vista from Windows XP, a System Recovery replaces Vista back to XP. Windows Vista will need to be reinstalled subsequently a Organization Recovery.
note:HP computers that ship with Microsoft Windows Vista do not come with recovery CDs. Instead, they utilize a space (partition) on the hard disk drive to shop the recovery information. The use of a subconscious partition provides a convenient process that eliminates the use of recovery discs that may exist lost or scratched. Recovery discs for Windows Vista can be created by using the Recovery Manager.
Starting a recovery from the hard bulldoze and the computer is off
If Windows Vista cannot open and if the Recovery partition on the hard disk drive is performance properly, you lot tin perform a Organization Recovery past performing the post-obit procedure:
note:If the RECOVERY or FACTORY_IMAGE partitions on the hard drive have been deleted OR the files in these partitions take been deleted, these steps will not piece of work. You must utilize recovery discs.
-
Plow off the estimator if information technology is not already off.
-
Disconnect all connected devices and cables such every bit the Personal Media Drive, USB drives, printer, and fax. Remove media from drives, and remove any recently added internal hardware. Do non disconnect the monitor, keyboard, mouse, and power cord.
-
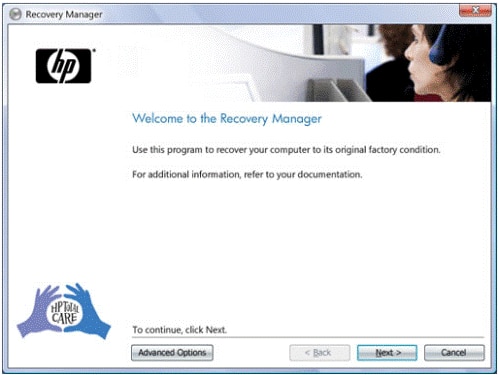
Turn on the computer and immediately press the F11 central repeatedly, about one time every second, until Recovery Managing director opens.
Figure : Recovery Managing director: Welcome to the Recovery Manager
-
Click Advanced options, and then click
Next.An Avant-garde options screen opens.
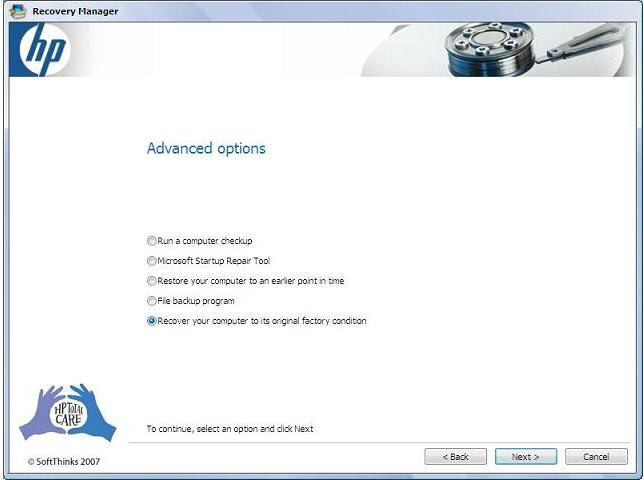
Figure : Recovery Manager: Advanced options
-
Select Recover your calculator to its original mill status, and then click Next.
-
The Recovery Manager gives you the pick of backing upwardly your information files. To do so, read Backing up your files.
To continue recovery, select No, and so click Adjacent.
Figure : Recovery Director: Screen with backup selection

-
A recovery progress screen opens. Look while files are restored.
Figure : Recovery Manager: Factory image recovery

-
When System Recovery is consummate, click End.
Figure : Recovery Manager: Recovery is complete
-
The calculator restarts and continues into Windows setup.
On the Se tup Windows screen, select the system language every bit you lot desire, if it appears. Then click Next.
annotation:
This selection volition but be avaialbe on selected models, depends on if your PC came with multiple languages or not.
Effigy : Prepare upwardly Windows screen:Screen with language selection

-
On the Review your regional and keyboard settings screen, select appropriate settings based on where your are now living in. Here is an example of the settings for Hong Kong for your reference:
-
In country or region box, keep as it was.
-
In time and currency box, select Chinese (Traditional Hong Kong Southward.A.R.).
-
In Keyboard layout box, select Usa.
Figure : Review your regional and keyboard settings screen

When y'all are done with all the settings, click Next.
-
-
On the license terms screen, click the I accept the license terms checkbox one past one, and and so Next.
Figure : license terms screen

-
On the next screen, enter a user proper noun and password, and then select a picture for your account as y'all desire, later that and then click Next.
Effigy : Choose a user name and picture screen

-
Follow the onscreen instruction to enter a figurer name and select a desktop groundwork, and so click Next.
Figure : Type a calculator name and choose a desktop background screen

-
When help procect Windows automatically appears, click Utilize recommended settings with the net connexion.
Figure : help procect Windows automatically screen

-
On the next screen, verify if the time zone, date and time is right or not, if not, change each incorrect setting accordingly unit all the settings are correct, and then click Side by side.
Effigy : Review your time and date settings screen

-
On the thanks screen, click Starting time to continue the rest of settings.
Figure : Thanks screen

-
On the welcome screen, click Brainstorm.
Figure : Welcome screen

-
On the registration screen, delight fill out the all the fileds, especailly for *required fields, and so click Next. Or you can click Register laterto skip the the registration at this moment.
Effigy : Register your prodcut

-
On the update screen, in social club to go on your reckoner in skillful condication, we recommend you to select Yes, notify me. to have the alerts from HP in future, so select what you desire to do with customer experience enhancements, after that click Next.
Figure : Update screen

-
On the secure screen, in social club to keep your system safe from viruses and spyware, we recommend yous to select I have the Symantec Software Service License Agreement, so click Next.
Figure : Secure screen

-
On the finish screen, clickFinish to complete the setup.
Figure : Finish screen

-
Turn off the figurer, reconnect all peripheral devices, and turn on the figurer.
-
Before using the calculator, update and protect your computer. Reinstall any virus and security software that was installed before the System Recovery.
Starting the recovery from the Windows Vista desktop
Use the following steps to recover the calculator starting from the Windows Vista desktop:
-
Turn off the computer.
-
Disconnect all connected devices and cables such as the Personal Media Drive, USB drives, printer, and fax. Remove media from drives, and remove any recently added internal hardware. Do not disconnect the monitor, keyboard, mouse, and ability cord.
-
Turn on the estimator.
-
From the Windows desktop click Start
 , and and so All Programs.
 -
Click PC Help & Tools.
-
Click Recovery Manager.
The Recovery Manager Welcome screen appears.
-
Click Next.
-
On the Software Program Re-installation screen select No, and then click Side by side.
-
On the Hardware Re-installation screen select No, and then click Side by side.
-
On the screen that prompts for Microsoft System Restore select No, and so click Next.
-
The Recovery Managing director prompts if yous want to restore the computer to its original factory shipped condition. Click Yeah, and then click Next.
The computer restarts and opens the Recovery Manager program.
If the recovery partitioning on the hd is performance properly the Welcome to the Recovery Manager screen appears. If the hard disk is damaged, a set of recovery discs is needed to run a Arrangement Recovery. Follow the instructions listed in the section, Starting the recovery from recovery discs.
-
Click Next.
-
On the Microsoft System Restore screen select No, and then click Side by side.
-
Confirm that y'all want to run a Organisation Recovery by selecting Yes, then click Side by side.
-
The Recovery Manager gives yous the option of backing upward your data files. To exercise so, read Backing upwardly your files.
If y'all do not want to backup your files, select No, and and so click Next.
-
Later the Organization Recovery is complete, the computer restarts and continues into Windows setup. For instructions about how to complete Windows setup, please encounter related steps for starting a recovery from the hard drive and the computer is off section.
-
Turn off the computer, reconnect all peripheral devices, and turn on the computer.
-
Before using the reckoner, update and protect your computer. Reinstall whatsoever virus and security software that was installed before the System Recovery.
-
Reinstall any software applications that were added later purchasing the figurer, and any files that were backed upward.
Starting the recovery from recovery discs
Use the following steps to recover the computer from a ready of recovery discs (either CDs or DVDs):
-
Turn on the computer, if it is not already on, and insert the outset recovery disc labeled #1.
-
After the first disc is in the drive and the drive is closed, turn off the computer by pressing and holding the ability button.
-
With the figurer off, disconnect all connected devices and cables such equally the Personal Media Bulldoze, USB drives, printer, and fax. Remove media from drives, and remove any recently added internal hardware. Do not disconnect the monitor, keyboard, mouse, and ability string.
-
Turn on the computer. The calculator opens the Recovery Manager programme.
-
By default the Recovery Managing director volition be prepare to run a System Recovery from the inserted recovery disc. Click Next.
-
On the screen that prompts for Microsoft System Restore select No, and and then click Next.
-
The Recovery Managing director gives you the option of backing up your information files. To do so, read Backing upwards your files.
If you do non desire to backup your files, select No, and and so click Next.
-
Read and respond to the screens as they announced. If a screen prompts for a disc, insert the next disc. In some cases, y'all may have to repeatedly insert the aforementioned disc several times before the screen allows you lot to continue.
-
After the System Recovery is complete, the computer restarts and continues into Windows setup. For instructions about how to complete Windows setup, please run across related steps for starting a recovery from the hard drive and the computer is off section.
-
Turn off the estimator, reconnect all peripheral devices, and plough on the reckoner.
-
Before using the computer, update and protect your figurer. Reinstall any virus and security software that was installed before the System Recovery.
-
Reinstall any software applications that were after purchasing the computer, and whatever files that were backed up.
Backing upward files during recovery
During the recovery process, you lot have the opportunity to back upwardly your files to a disc or other removable bulldoze. Once you have started one of the previous recovery methods and have come to an option to fill-in your files you tin can use the following steps to complete the backup and recovery process:
-
Outset 1 of the recovery methods described in the other sections of this document and go on reading and responding to the screens until yous come to the question "Do you want to back up your data before recovery begins?"
-
Select Support your files, and click Next.
Figure : Recovery Manager: Support your files offset selection

-
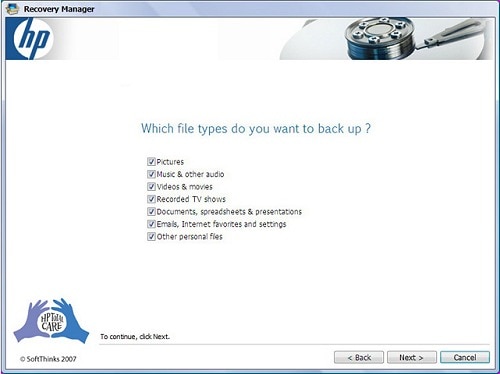
Select the types of files that y'all would similar to save. De-select the file types that you lot know you do non want. Click Next when done.
Figure : Recovery Manager: Which file types do you desire to fill-in?
-
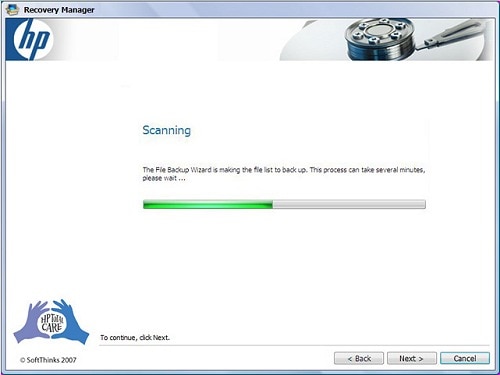
A Scanning screen opens. Wait for Recovery Manager to scan for files that tin can exist backed up.
Figure : Recovery Director: Scanning
-
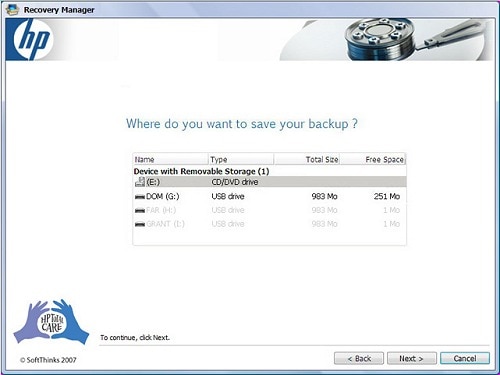
Select a storage device from the listing.
Figure : Recovery Manager: Where do you want to save your backup?
-
Click Adjacent.
-
The next screens vary, depending on what type of storage device was selected. Read and respond to the screens that open up to transfer the files from the difficult drive to the device. If you selected a CD or DVD drive, you volition be prompted to insert a blank disc.
note:
If the process fails, make sure the storage device is big enough to accept the files. Yous can also effort de-selecting the file types to reduce the amount of files that are copied. Other reasons for failed backups might exist caused by file corruption. In some cases, it is not be possible to save files using this backup method.
-
When Recovery Manager is finished bankroll upward files, you can remove the backup disc or storage device and go along with the recovery process (by clicking Side by side).
Effigy : Recovery Director: Your Fill-in was created successfully

Source: https://support.hp.com/in-en/document/c01906259
0 Response to "How To Reset Hp Compaq Desktop To Factory Settings"
Post a Comment